What is secure DNS + How to enable it?


Secure DNS is a feature that protects the security and privacy of your web browser when you connect to websites. Without secure DNS or other security tools, web traffic could be altered or stolen, leaving your device and data at risk. Learn how secure DNS works and how to enable it on your browser or device. Then, get Norton 360 Deluxe, an all-in-one cybersecurity tool with a built-in VPN, to help protect your online activity from hacking and eavesdropping.
Secure DNS explained
Secure DNS, or DNS over HTTPS, is a feature that protects the internet’s DNS (Domain Name System) infrastructure. Usually DNS has no security protection, making you and your data vulnerable to attacks. Secure DNS encrypts DNS traffic that flows between your browser and the websites you visit to help stop hackers, advertisers, and others from intercepting or altering the data.
How secure DNS works and why it's important
Secure DNS works by encrypting and authenticating DNS traffic to protect against interception and manipulation. It’s a layer of protection for otherwise defenseless DNS traffic, which is at risk of eavesdropping, tampering, and data tracking from hackers, advertisers, and internet service providers (ISPs).
The DNS (Domain Name System) is a publicly accessible online directory, like the “phonebook” for the internet, that matches a website’s natural-language domain name (for example, “google.com”) with its respective IP address, which your browser uses to connect to the website.
DNS has been an integral part of the internet since it was developed in the 1980s — but it wasn’t designed with security in mind. DNS traffic lacks encryption and can be intercepted and altered in a man-in-the-middle attack. Without secure DNS, your browser could also be re-routed to malicious websites, your activity could be tracked, or your personal data could be stolen.
Secure DNS — technically known as DNS over HTTPS — is important because it addresses the vulnerabilities inherent in DNS alone. It performs DNS resolutions via HTTPS, the encrypted system of data communication that’s widely used on the internet.
Essentially, secure DNS is regular DNS that’s enhanced with HTTPS for encryption protection. It’s usually deployed through an app, or as a proxy on a nameserver or an operating system.
Though secure DNS is a start, hackers have plenty of other ways to get to your data and device. Norton 360 Deluxe provides a multi-layered approach to protecting devices and online privacy. It includes a secure VPN to encrypt your web traffic, plus a variety of other features to help protect against malware and other threats.
How to enable secure DNS
There are many secure DNS options available for operating systems and web browsers. On some devices, you may need to look up the IP address of the secure DNS server you wish to use before you can enable it.
Follow along to learn how to enable secure DNS on common browsers and device types.
Google Chrome
Here’s how to enable secure DNS on Google Chrome:
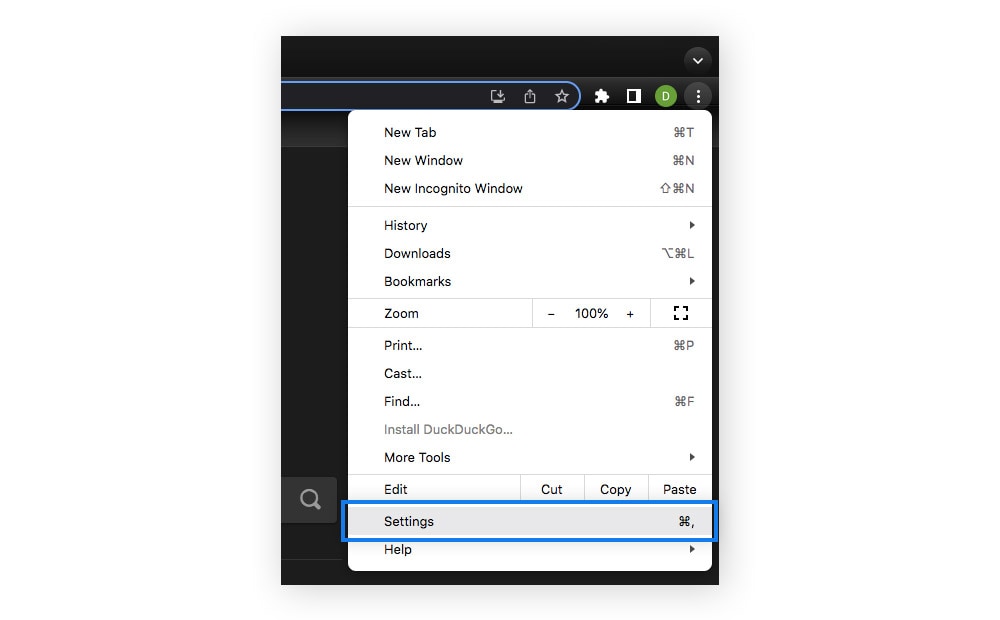
1. Open a browser window, click the three-dot menu, and choose Settings.
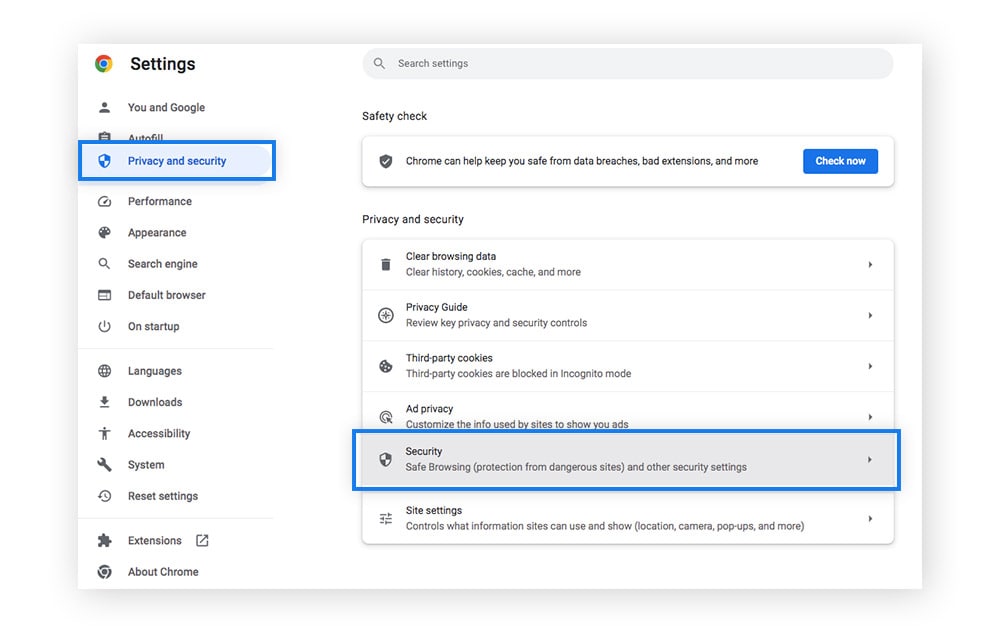
2. Select Privacy and security in the left panel, then click Security.
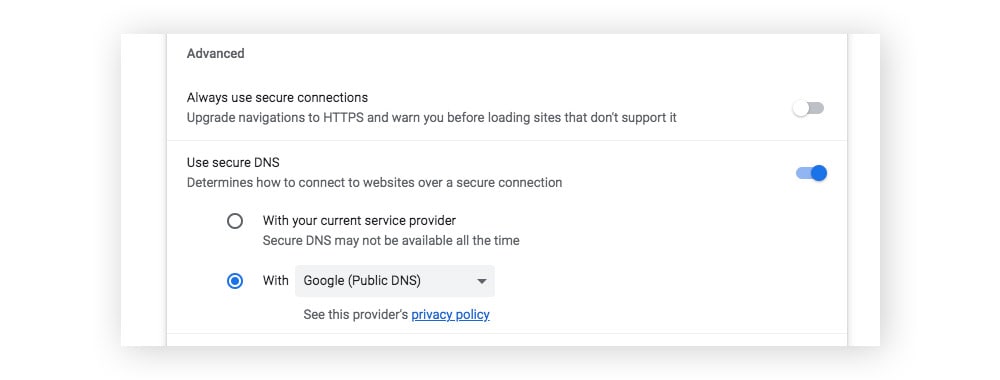
3. Scroll to Advanced and toggle on Use secure DNS. Click With and use the drop-down menu to change the server to Google (Public DNS) or another option.
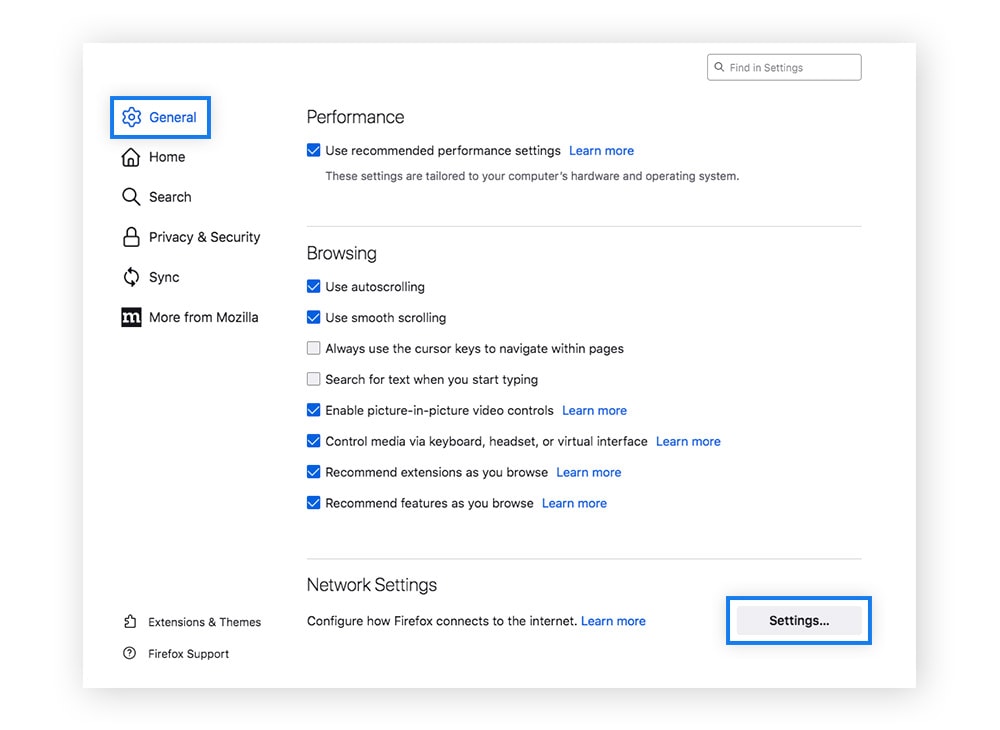
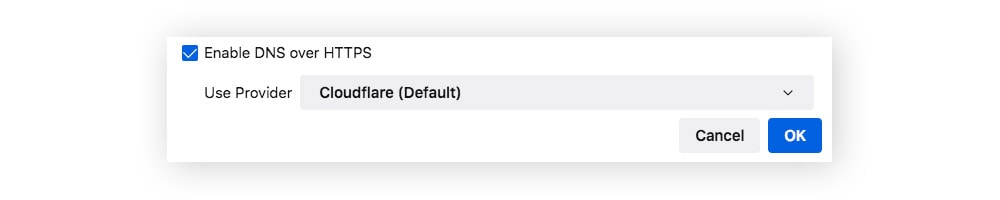
Firefox
Here’s how to enable secure DNS on Firefox:
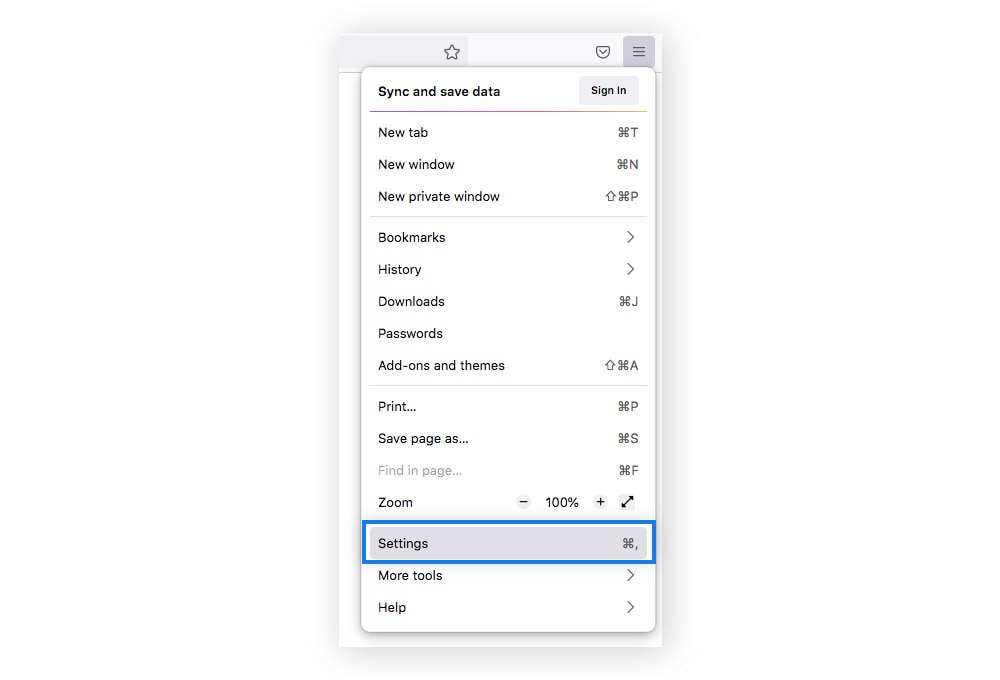
1. Open a browser window, click the three-line menu, and choose Settings.
2. Select General in the left panel. Scroll to Network Settings and click Settings.
3. Select Enable DNS over HTTPS and use the drop-down menu to choose a server. Click OK.
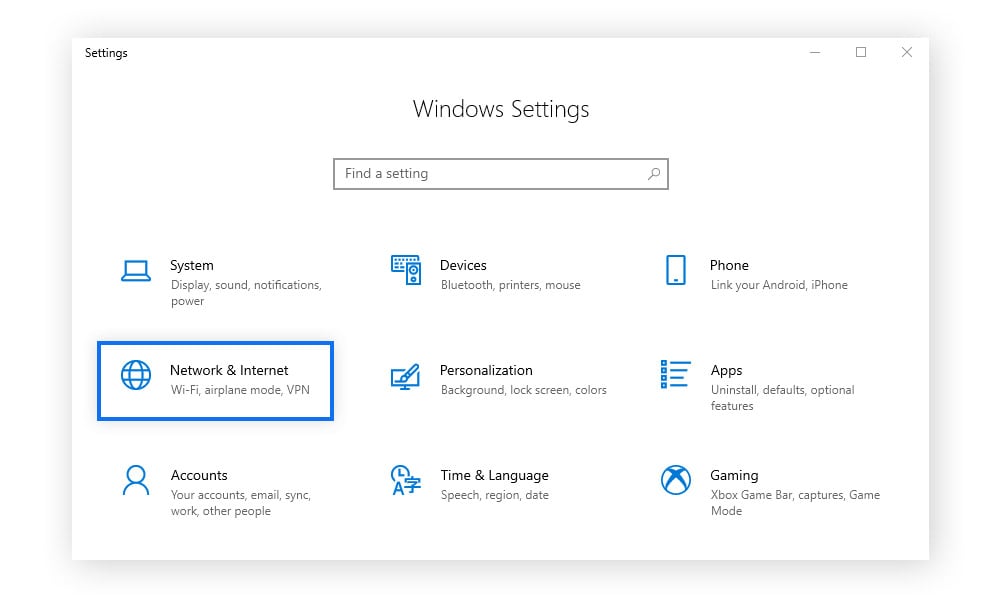
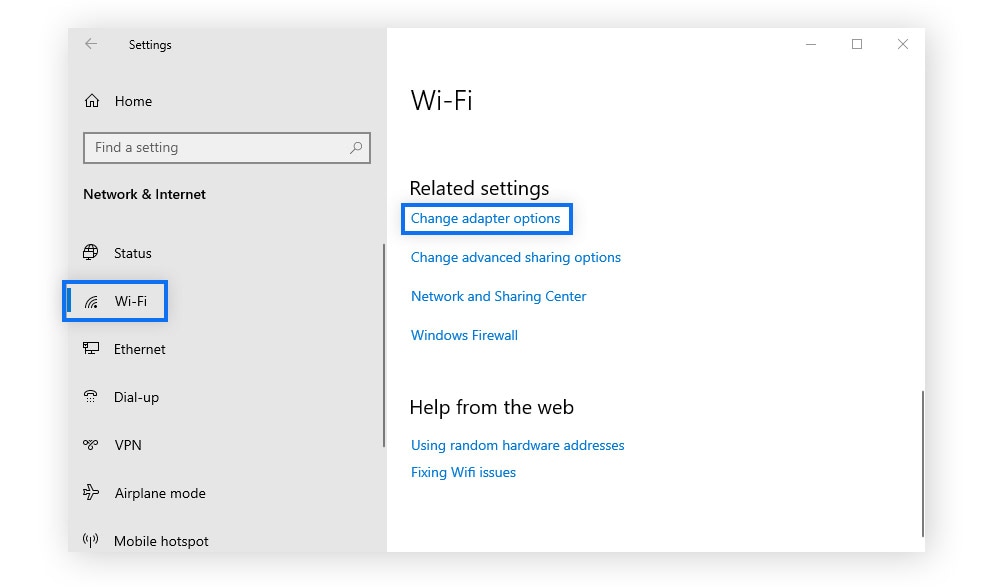
Windows
Here’s how to enable secure DNS on a Windows device:
1. Open Windows start and select Settings (the gear icon). Click Network & Internet.
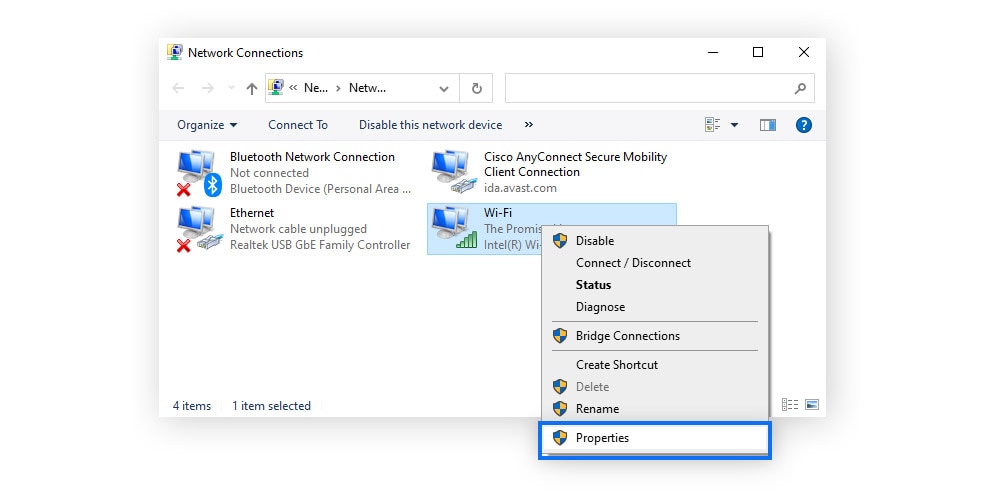
2. In the left sidebar, choose Wi-Fi or Ethernet, depending on the network connection you want to configure with secure DNS. Then scroll to Change adapter options.
3. Right-click your chosen network connection and select Properties.
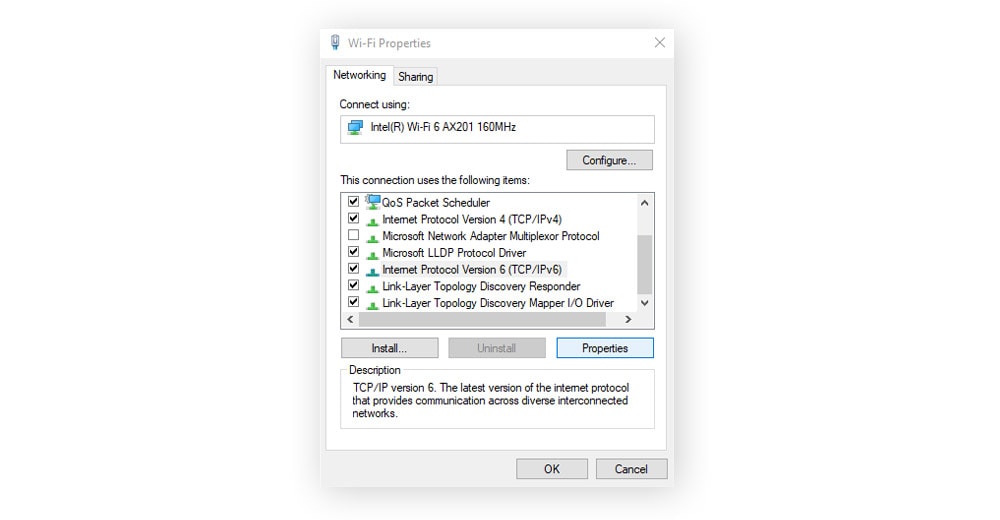
4. In the Properties window, scroll down and find the Internet Protocol Version 4 (TCP/IPv4) or Internet Protocol Version 6 (TCP/IPv6) entry, depending on your network configuration. Select it and click Properties. In the next window, click Advanced.
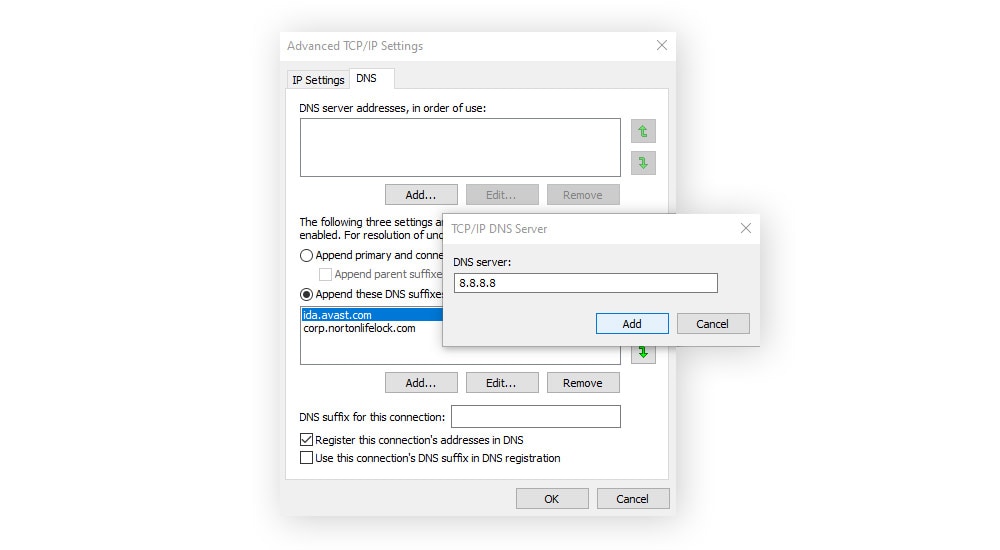
5. In the Advanced TCP/IP Settings window, choose the DNS tab. Click Add and enter the IP address of the secure DNS server you want to use. Then click Add to add the secure DNS server. Click OK to save changes.
Mac
Here’s how to enable secure DNS on Mac:
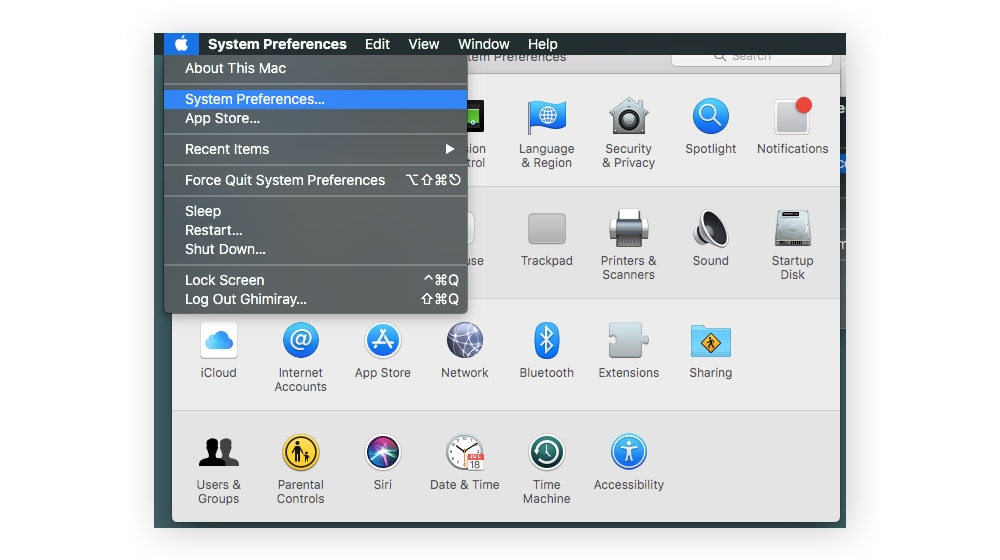
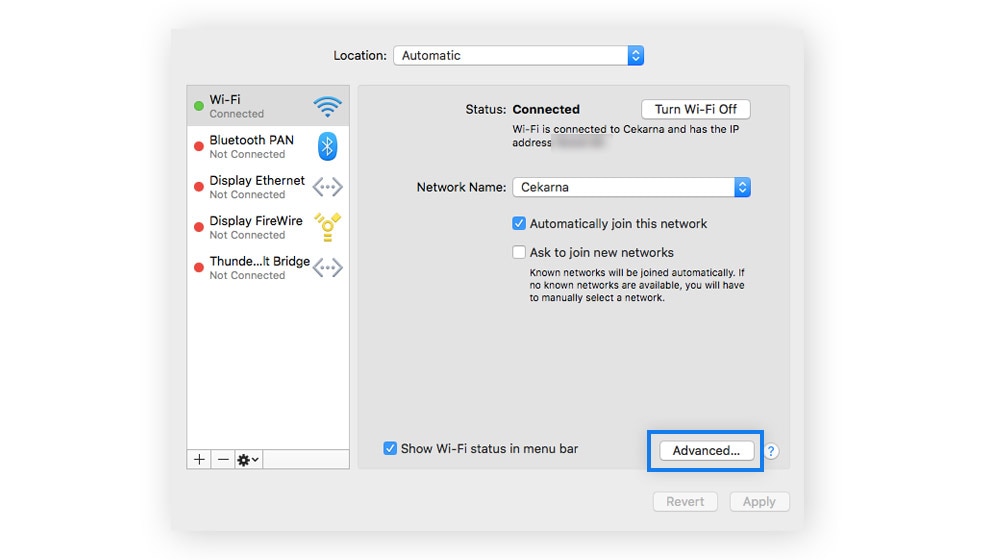
1. Go the Apple menu, select System preferences, then open Network.
2. Select the network connection you want to configure with secure DNS. Click Advanced.
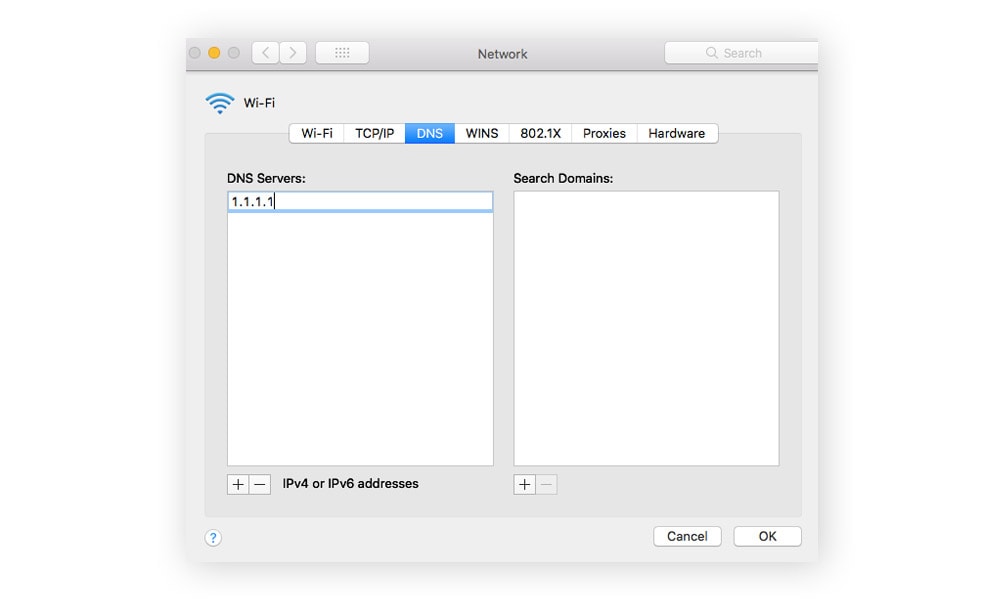
3. Select the DNS tab and then press the + (add) button under the DNS servers text box. Enter the IP address of the DNS server and click OK. Back on the Network page, select Apply to save the changes.
Android
Here’s how to enable secure DNS on an Android device:
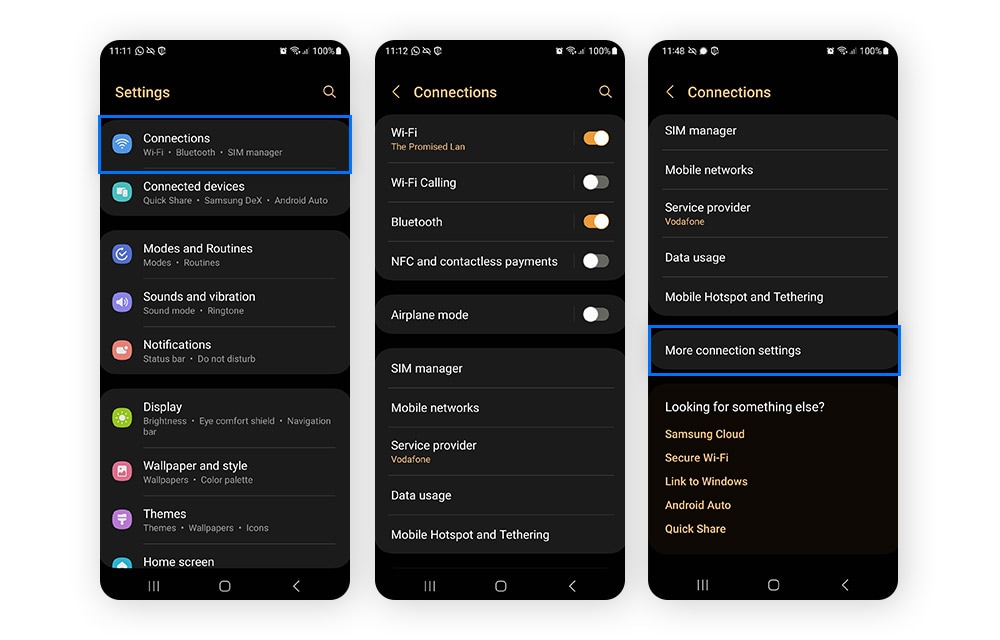
1. Go to the Settings and tap Connections. Scroll to More connection settings.
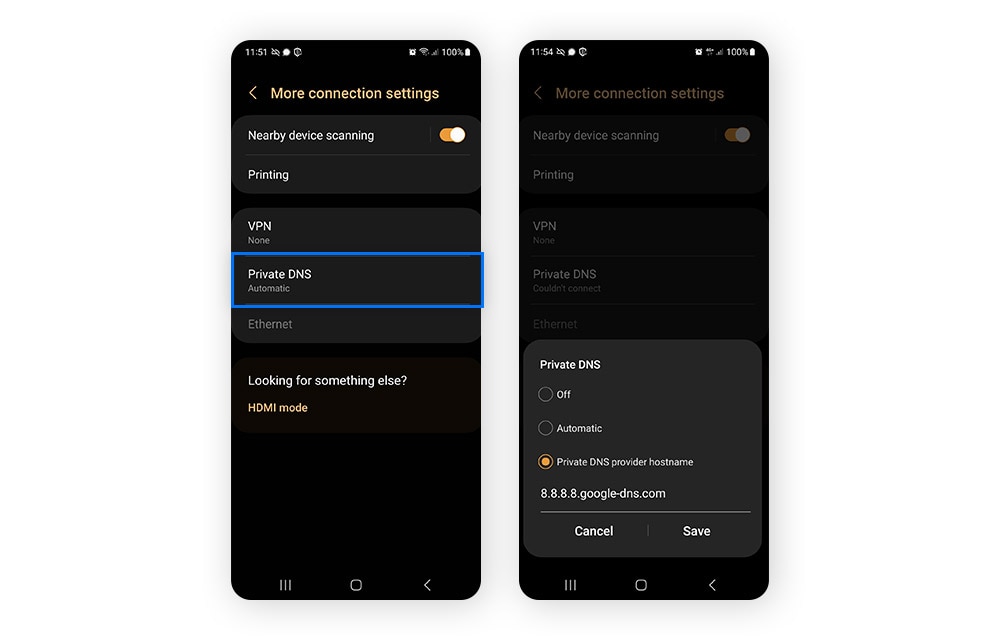
2. Tap Private DNS, then select Private DNS provider hostname or Private DNS mode. Enter the hostname of the secure DNS server you want to use. Tap Save.
iOS
Here’s how to enable secure DNS on iOS:
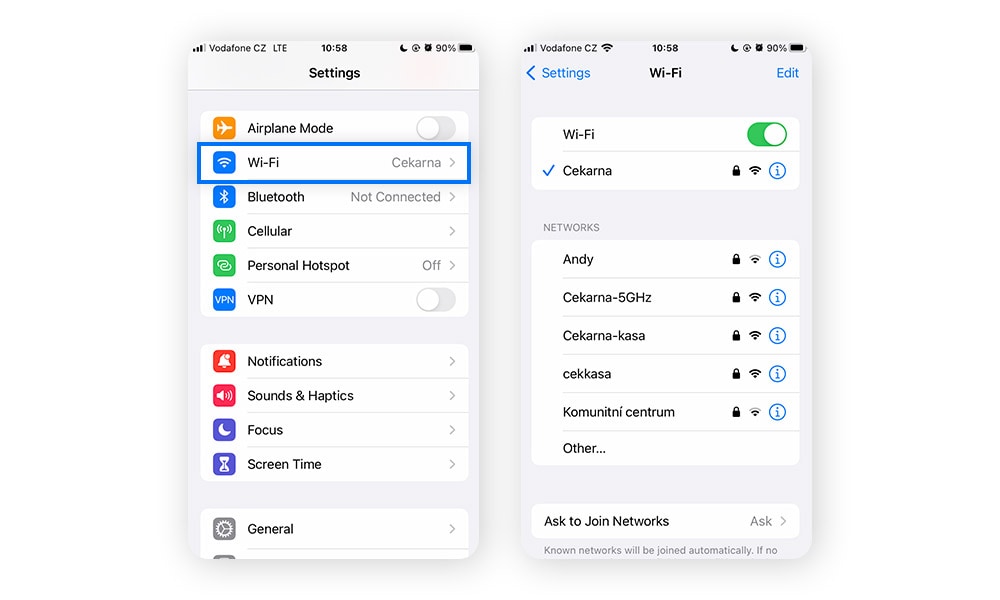
1. Go to Settings. Select Wi-Fi or Cellular, depending on the network connection you want to protect with secure DNS. Next to your network, tap the (i) icon.
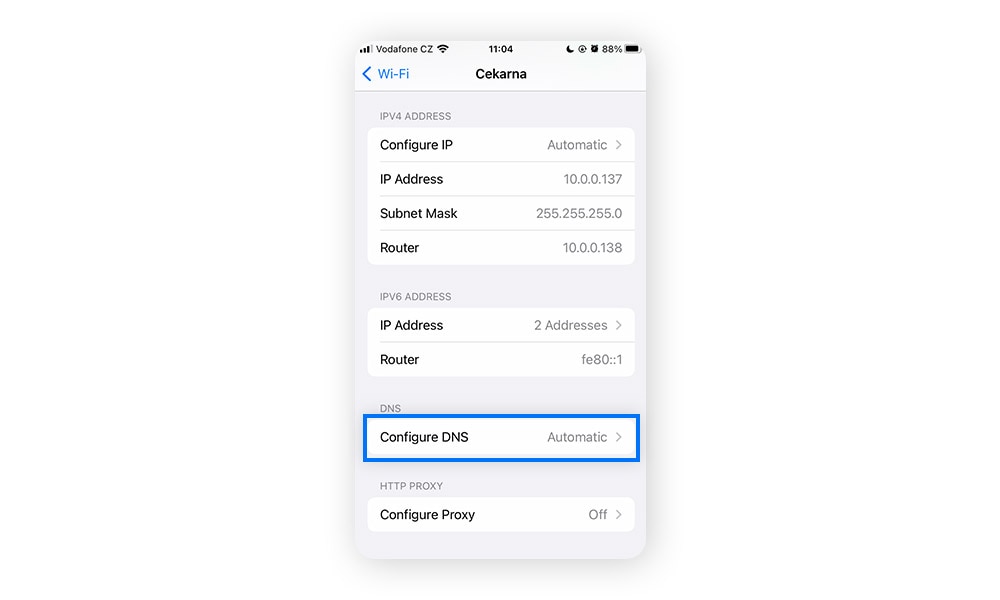
2. Scroll down and tap Configure DNS.
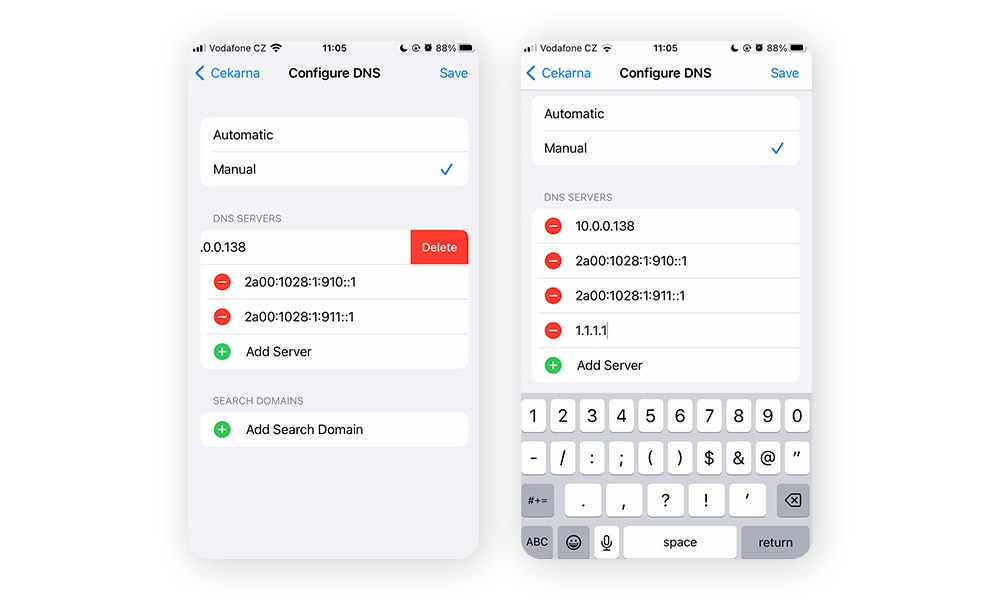
3. Choose Manual and tap the – (delete) button to remove any existing DNS servers. Then, tap + Add Server and enter the IP address of the secure DNS server you want to use. Tap Save.
Although secure DNS will help protect your DNS connections, there are some trade-offs. Namely, you may experience performance or compatibility issues on some network connections. In these cases, you can revert back to your previous configuration or seek out another secure DNS server option.
Risks of traditional DNS
Traditional DNS communication between a browser and a website's nameserver can be risky because it’s unencrypted. The data in transit can be vulnerable to eavesdropping and manipulation, which could lead to serious issues for both users and websites.
Here are some common types of attacks that target DNS:
- DNS spoofing: In a DNS spoofing attack (also known as cache poisoning), fake DNS records are inserted into your browser's DNS cache. When you make a website request, the fake DNS data translates to a spoofed IP address.
Usually in this type of website spoofing, victims end up on fake versions of legitimate sites, which contain malware or collect login details. If you’re suspicious of a link, learn how to check if a website is safe. - DNS tunneling: In a DNS tunneling attack, an attacker encodes data into DNS traffic. Because firewalls and other security systems don’t inspect DNS requests, the attack can slip past your device's built-in defenses.
The hidden data serves various malicious purposes, including data collection, command and control (C2) communication for malware, or bypassing network restrictions. - DNS hijacking: In DNS hijacking, your website requests are re-routed to a different DNS server — either using malware or altering the legitimate DNS server. Though similar to spoofing, DNS hijacking is considered a pharming attack, since it alters the DNS record on a nameserver rather than in your DNS cache.
Passive DNS hijacking can occur on a local network or have a more widespread effect within the global DNS infrastructure. The attack can be used for data interception, spreading malware via phishing attacks or creating general havoc on a network system. - DOS attacks: A DNS-based DoS (Denial of Service) attack aims to overwhelm the targeted DNS infrastructure or servers with activity. An example is a NXDOMAIN attack, which floods a targeted server with a high-volume of requests for non-existent DNS records.
Even Ultimately, these attacks aim to deny service for legitimate users by consuming a server’s resources and preventing it from handling real DNS requests. - DDoS attacks: DNS-based DDoS (Distributed Denial of Service) attacks are large-scale, coordinated DoS attacks. An example is a phantom domain attack, which engulfs a targeted server with requests to domains that are designed to react slowly, or not at all.
These types of attacks disrupt the functionality of DNS services, resulting in widespread outages that affect websites, email servers, apps, and other DNS services.
Get comprehensive device protection
Secure DNS addresses the security vulnerabilities within the DNS system — but hackers and snoops have other ways to steal your data and meddle with your device. Norton 360 Deluxe helps protect against viruses and other malware, block hackers, and prevent you from visiting fake websites. Plus, it features a built-in VPN to help keep your internet browsing private — both at home and on public Wi-Fi. Get the powerful online protection you need with Norton 360 Deluxe.
FAQs about secure DNS
What other ways can you protect against DNS-related attacks?
You can protect against DNS-related attacks with DNS Security Extensions (DNSSEC). These security protocols require authentication across all layers of DNS, in the form of a unique digital signature. By ensuring the authenticity of DNS data, DNSSEC gives confidence to end users that the data they receive has not been tampered with.
What is a DNS firewall?
A DNS firewall is a tool that protects DNS servers and enhances their performance. During a DoS or DDoS attack, the DNS firewall can provide rate-limiting services to stop attackers from overwhelming a server. In case of downtime due to an attack, it can keep the website or service running by serving DNS responses from the cache.
Are DNS queries private?
DNS queries are not private. DNS was originally designed as a public database and has no inherent confidentiality controls. DNS queries and nameserver responses are unencrypted and, therefore, vulnerable to a variety of attacks. Along with secure DNS, Tor browser, VPNs, and proxy servers can enhance privacy on the web.
Smart DNS vs VPN
Both Smart DNS and a VPN let you access geo-restricted content by letting you connect to servers from around the world — rather than just default local servers. In addition, a VPN encrypts your internet connection and hides your IP address. A Smart DNS doesn’t offer more protection, but it may give you faster speeds than a VPN.
If your VPN is acting funny, use our VPN test to see if it’s working correctly.
Editorial note: Our articles provide educational information for you. Our offerings may not cover or protect against every type of crime, fraud, or threat we write about. Our goal is to increase awareness about Cyber Safety. Please review complete Terms during enrollment or setup. Remember that no one can prevent all identity theft or cybercrime, and that LifeLock does not monitor all transactions at all businesses. The Norton and LifeLock brands are part of Gen Digital Inc.


Want more?
Follow us for all the latest news, tips and updates.